


Get comprehensive security and privacy for your phone with Avast One
- Security
- Privacy
- Performance
As far as operating systems go, Apple’s macOS is one of the most secure — but there’s still plenty of room to take your Mac protection to the next level. Learn how to optimize your Mac security settings and keep malware and other threats off your machine with Avast One.

Macs have had exceptional security records for decades, largely for two reasons. One is that Macs are built with strong protective features and very few exploitable vulnerabilities. The other is that most of the world owns PCs, so that is where cybercriminals have concentrated the bulk of their efforts. But the tide is changing, and hackers are learning how to circumvent Mac security protocols.

This Article Contains:
With 2016’s KeRanger, the first Trojan ransomware for macOS, and 2017’s Patcher, a Mac ransomware spread through BitTorrent, we’ve seen that Macs are not invulnerable. Their security is strong straight out of the box, but there are several extra security settings that bolster your protection if you set them up.
There’s more than just malware attacks on Macs that you should be concerned with — cybercriminals are always turning up with spoofed websites and all sorts of phishing scams, trying to get you to slip up. So what can you do? Using a strong antivirus is the first step. Then add these seven solid tips to take your security defenses to the next level.
Read on for everything you need to know about Mac security and how to protect yourself.
First, let’s look at the bulk of your built-in security tools. In System Preferences, click on Security & Privacy. You should see 4 tabs — General, FileVault, Firewall, and Privacy. Click the padlock icon to unlock your Mac security preferences and make changes. (It will ask for your password in order to proceed.)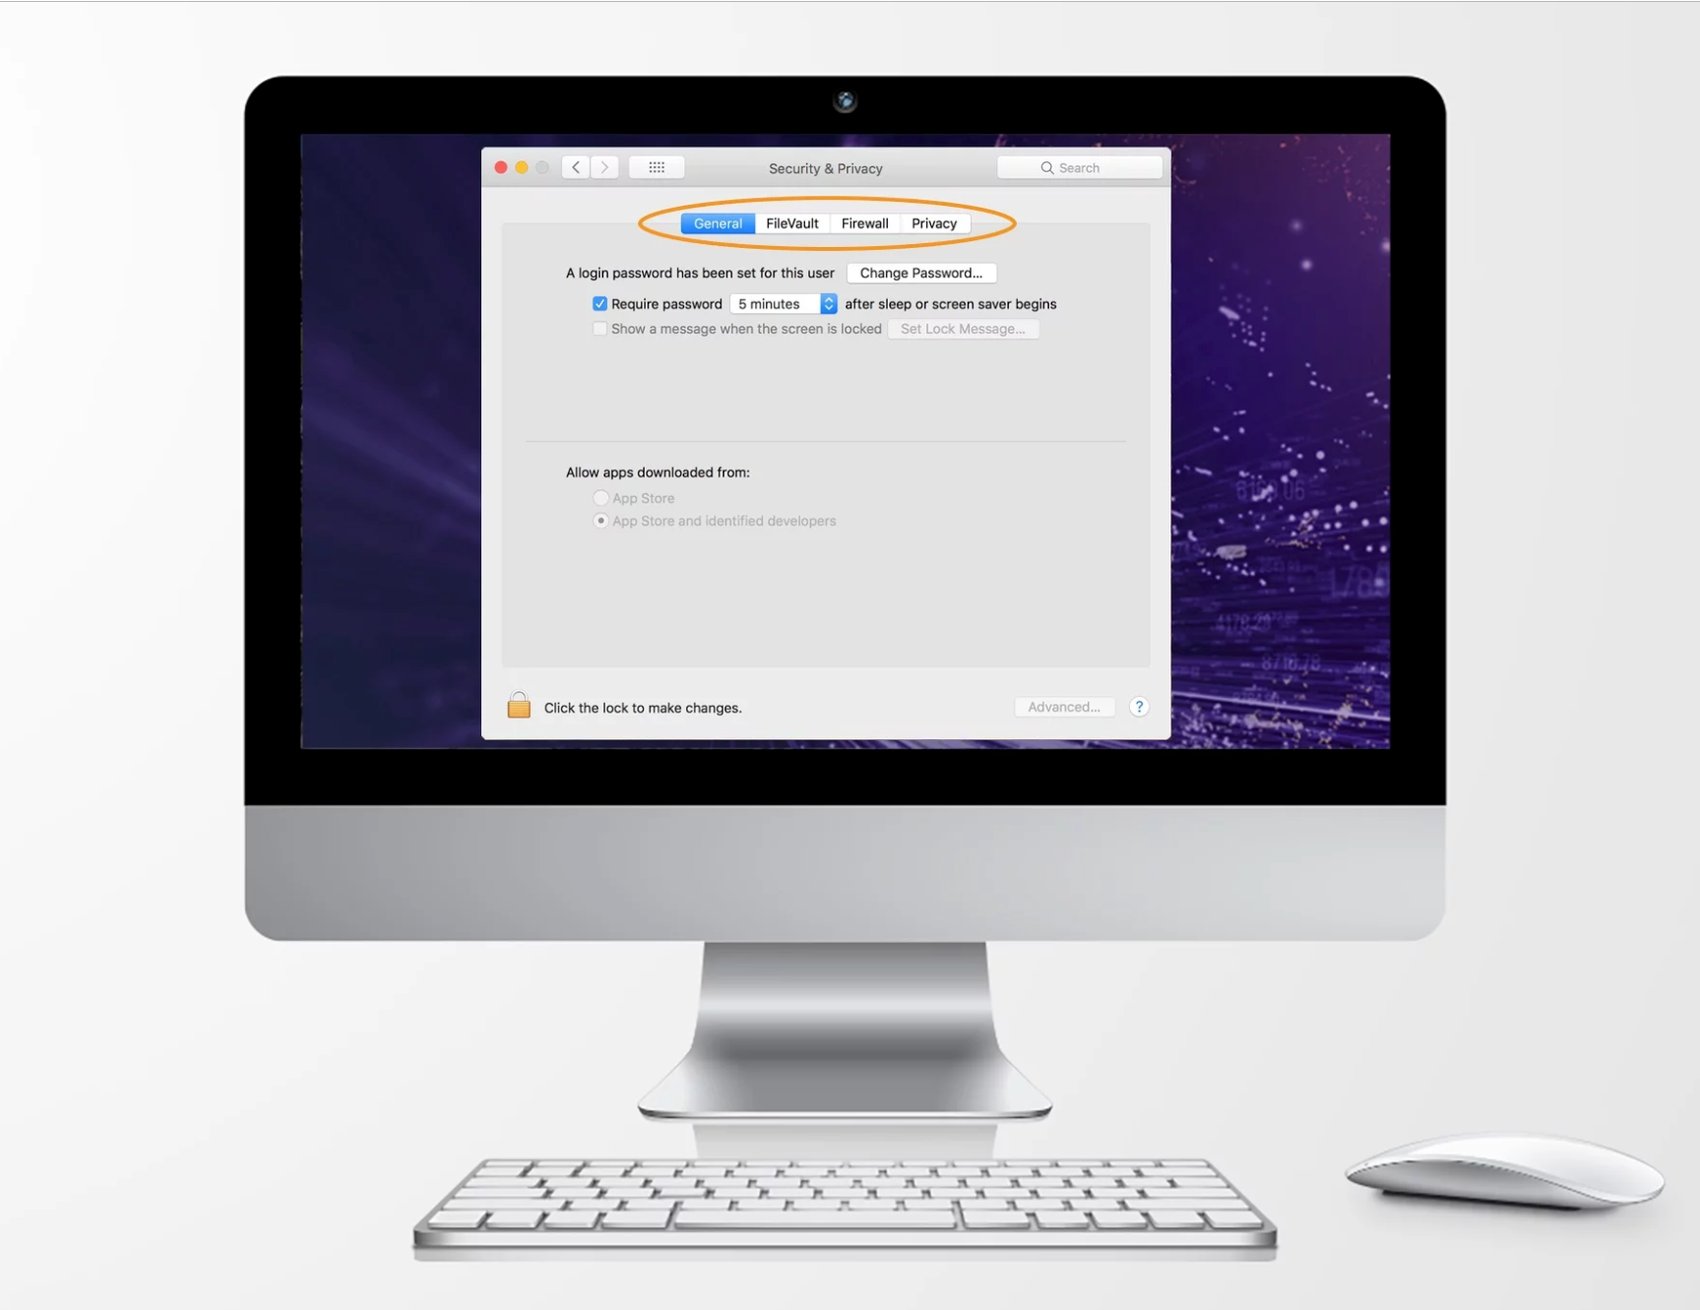
This first tab allows you to take the most important step: setting a login password. If you have the choice to disable automatic login, check that box. Choose a strong password, and all trespassing fingers, be they from a snooping family member or a laptop thief, will be unable to get past the login screen.
In this window, you can also change your password as well as elect to require it after your computer is idle for a certain amount of time.
Lastly, you can select if you want to allow app downloads solely from the official Apple App Store or also from “identified developers.” As a general rule, because all apps are vetted and measured to Apple’s standards, you can trust what you download from the App Store. Downloading apps from Apple’s identified developers is not necessarily a bad idea, as Apple will only approve developers who have proven themselves reliable, but the apps themselves won’t be vetted as comprehensively as those from the App Store.
FileVault encrypts the data on your hard disk so that if anyone forces their way in, they cannot decrypt your data without a password or security key that you set. We strongly recommend you turn on FileVault.
Encrypting all your data is a laborious job, but your Mac will do it in the background while your computer is running, so you won’t experience downtime.
If you’ve ever worked in the corporate world, you know every security-conscious business uses a firewall to protect their network by blocking unwanted incoming traffic. We recommend you activate the firewall on your Mac.
When you do, click Firewall Options. In the dialogue box, you’ll see a list of all those apps and services that your system is allowing in. If you’d like to add or subtract any, use the + and - buttons at the base of the box.
Also, check the box to Enable stealth mode. This gives you extra protection by putting a sort of invisibility cloak over your system. Any outside networks that try to ping it will get no response.
The Privacy tab is where you set permissions for your apps to determine which type of personal data and content they can access. The data categories are:
Location Services
Contacts
Calendars
Reminders
Photos
Accessibility
Analytics
When you click on one of those data categories, you will see a list of your apps that have requested access to that particular data. For instance, “Maps” would like to access your Location Services. Run through each of these categories, confirming or updating your settings as you deem appropriate. Make sure all the access permissions make sense — there’s no need to give an app access to data it shouldn’t need. When you’re done, click the padlock icon back into its locked position, and close the window.
In System Preferences, click on Sharing. On the left side of the window, you’ll see a list of all the sharing services. The checked boxes show you what you are actively sharing at the moment. Clicking on a service brings up a summary of what it does.
Go through the list to make sure you are only sharing what you absolutely need to share. If it’s not essential, don’t share.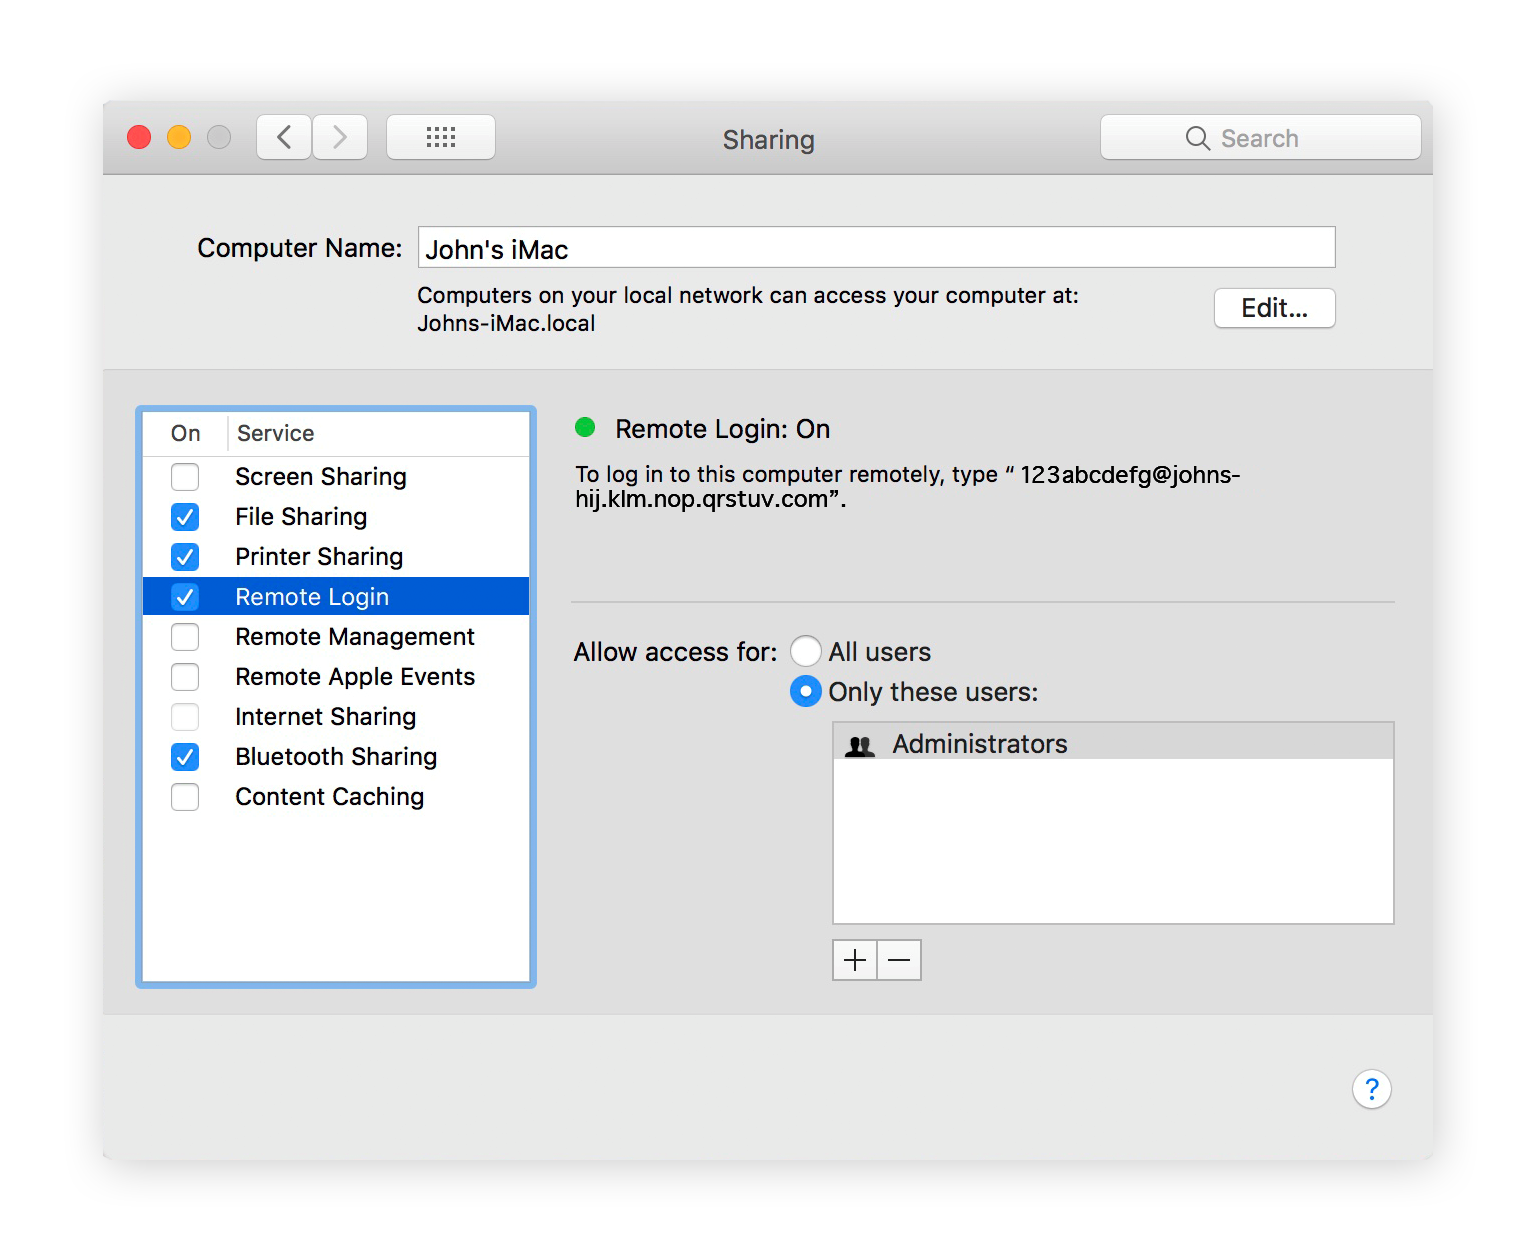
Whether you are using Safari or something else, open up Preferences and find the tab(s) for security and privacy. Read through your options and select anything that deactivates website tracking or gives you options on deleting tracking cookies. If the browser offers “safe browsing” in the form of reporting fraudulent websites, check that box too. Make sure you’re satisfied with all your browser settings.
In Safari, under the Privacy tab, you can select Manage Website Data. Clicking this shows you a list of all the websites you’ve visited that currently have data stored on your machine, whether in the form of caches, cookies, databases, or simple local storage. If you’ve never checked this list before, it’s going to be long.
Scroll through it and delete any websites you consider nonessential. If you are wiping their cookies clean from your computer, it just means that the next time you log onto it, it will load fresh instead of relying on data it stored on your end.
It might seem like a no-brainer, but you’d be surprised to learn just how many Mac users either forget or ignore their Mac security updates. Installing these updates ASAP and backing up your system are both fundamental practices for keeping your Mac healthy.
OS updates are meant to improve your computer, usually in the form of security. Updates patch vulnerabilities, fortify security, and improve performance. Some people fear that if they update their system, they’ll lose valuable data, or get confused by a new interface and additional tools. Take our word for it: a system update is your friend.
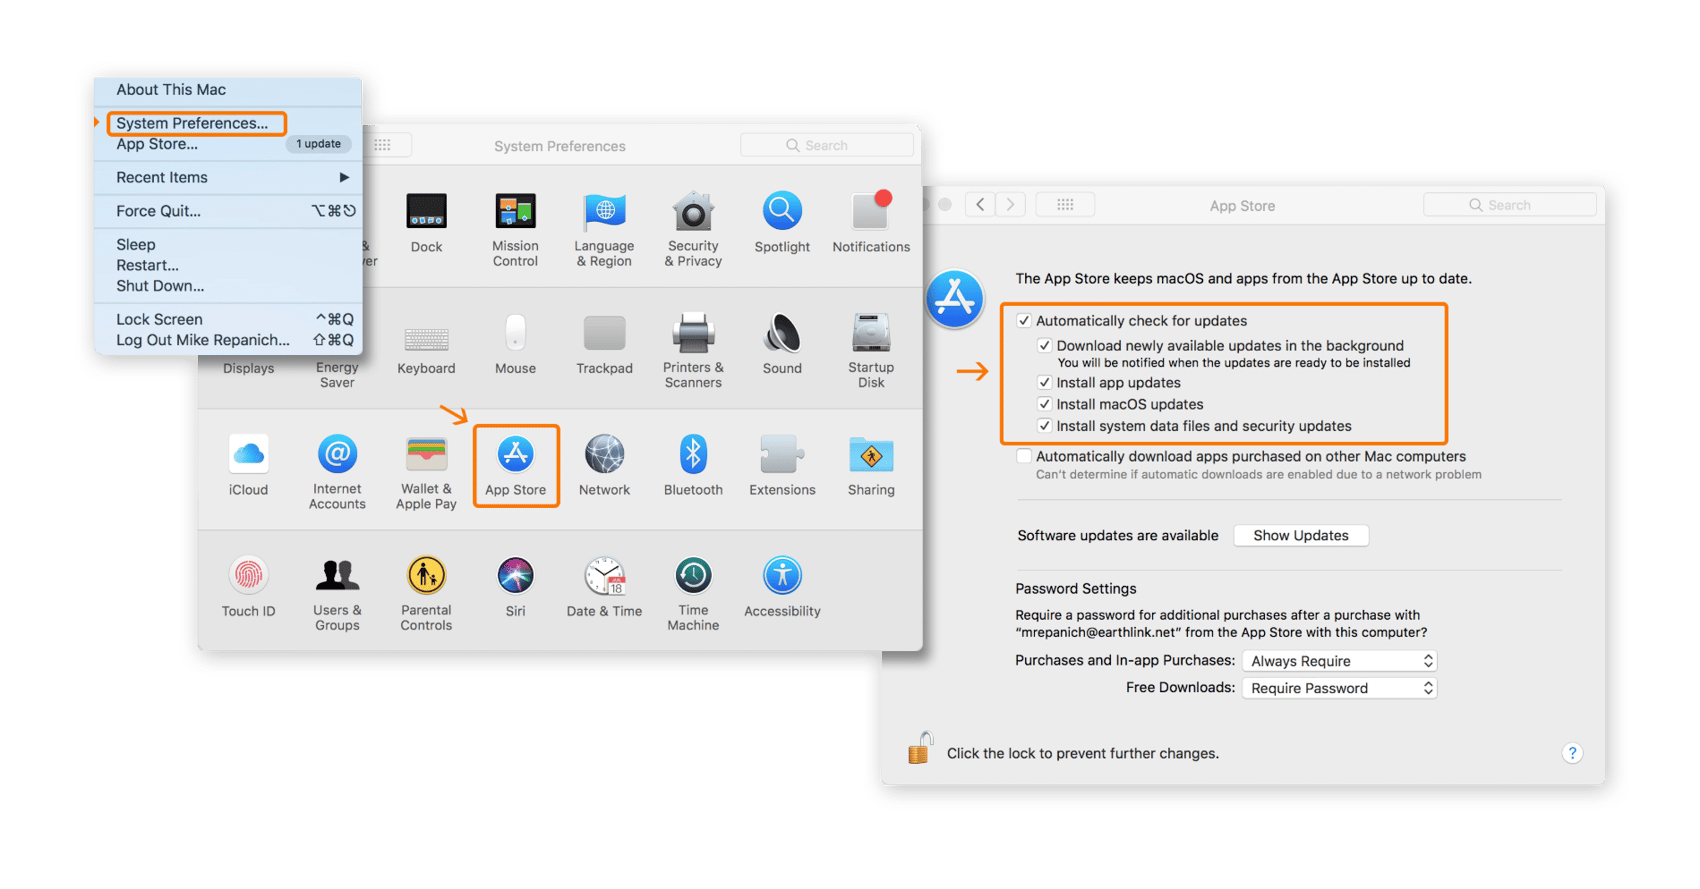 Recommended: Check everything under “Automatically check for updates” and your OS and apps will update automatically when available.
Just as some don’t update, others don’t back up. It’s not that they don’t believe in it — everyone knows a backup of your data is a useful thing to have just in case — it’s that they simply don’t take the time to do it. But it’s more than worth it.
Invest in an Apple Time Capsule or an external hard drive and set an automatic nightly backup to occur. You’ll sleep well knowing that if anything happened to your computer or if you get hit with ransomware, you’ve still got everything you need. Here are Apple’s official guidelines for backing up your Mac if you want to look at all the options.
Here’s a bit of bad news: when you empty the Trash your Mac, your files aren’t gone gone. They’re just rendered invisible, ready to be overwritten in the future when your computer needs more space. macOS used to have a nifty feature called Secure Empty Trash, but it only works on older macs with hard disk drives. Since Apple’s shift to solid state drives by default, this feature has been discontinued with macOS El Capitan and all subsequent versions.
Instead, your best bet for file security is to encrypt your entire drive with FileVault, as we describe above in Mac Tip #1.
If you want to ensure that your files are permanently deleted, you’ll need to turn to third-party software. Avast Cleanup for Mac erases files in your Trash bin while also scouring your Mac for any other unwanted digital clutter that might be slowing things down.
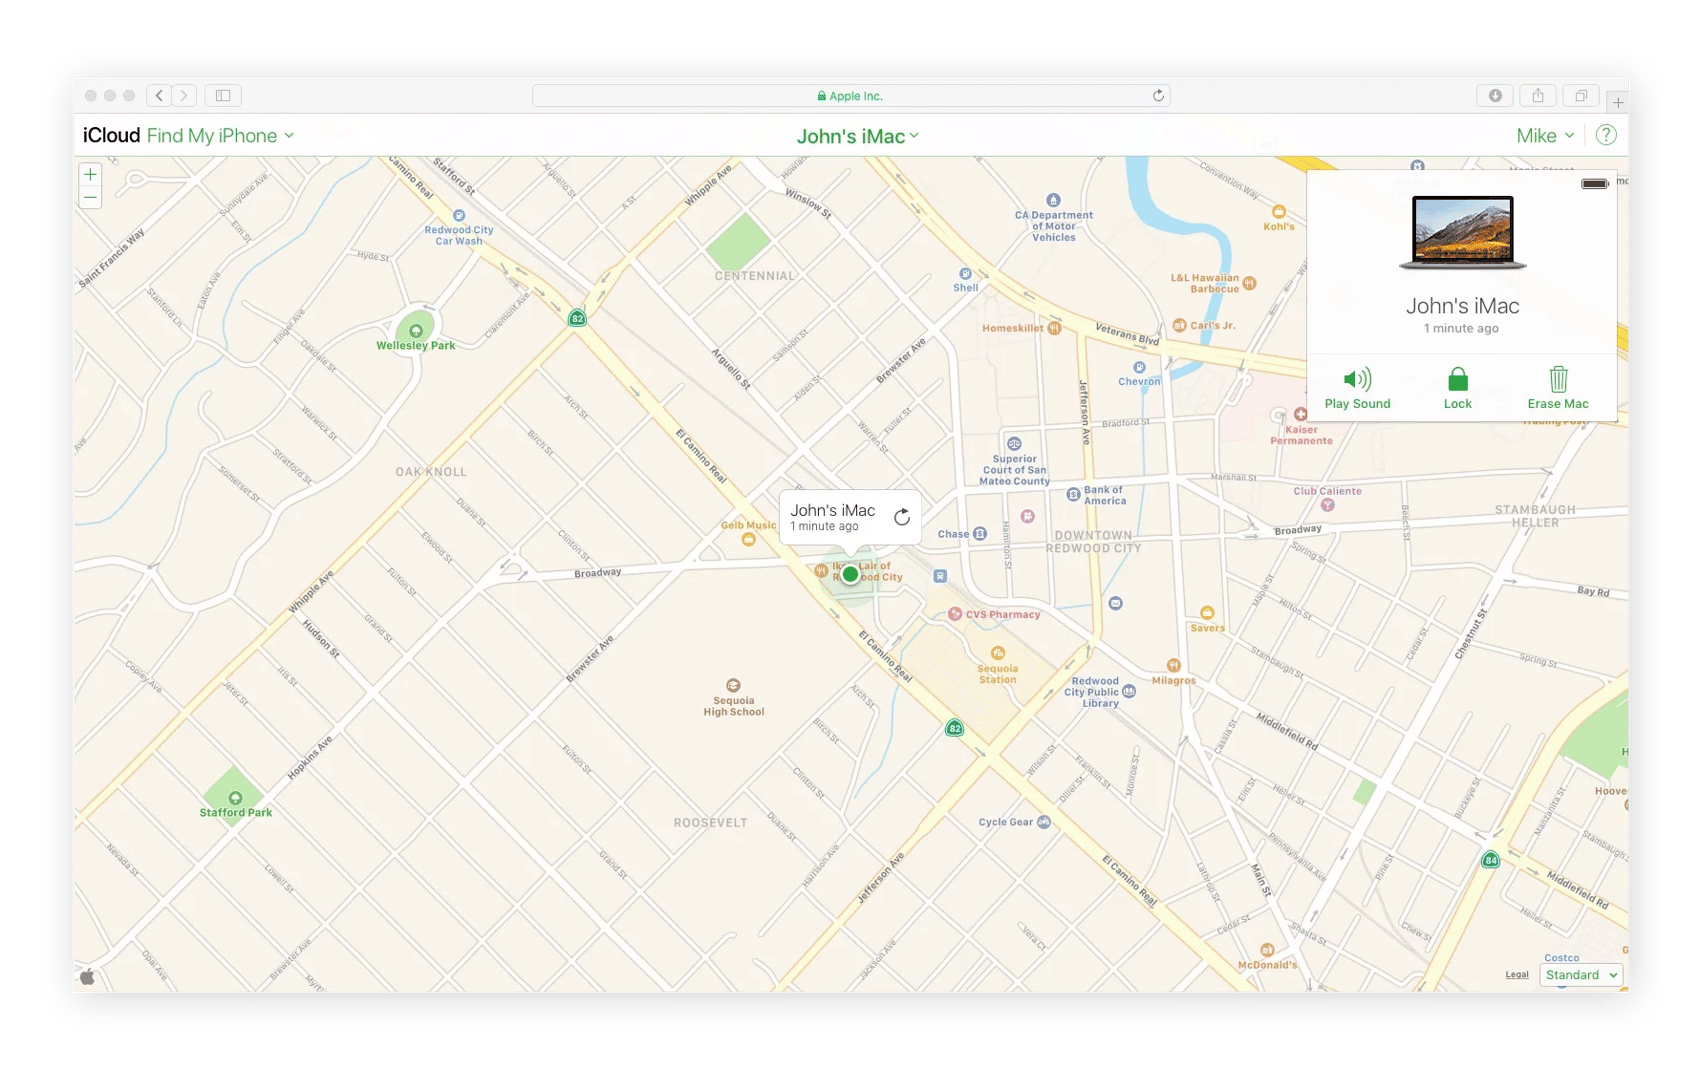
This tip is to protect your Mac from old-school thieves, the kind that snatch it physically and run. Find My Mac lets you locate your computer on a map using GPS tracking, lock it remotely so that nobody can get in, and even wipe all the data remotely. We need to adjust your settings for this, so open up System Preferences and click the padlock to make changes.
First, in System Preferences → Security & Privacy → Privacy, check Enable Location Services.
Then, in System Preferences → iCloud, if you scroll to the bottom of the box, you’ll see Find My Mac. Tick the box.
One last thing: Find My Mac only works when your computer is connected online. For this reason, you need to enable a guest user to be able to log on. That way, if your Mac ever gets stolen, you’ll find it easily when the thieves are dumb enough to boot it up. Go to System Preferences → Users & Groups. On the left side, click on Guest User, then check the box Allow guests to log in to this computer.
If you ever want to find your Mac, navigate to https://www.icloud.com/find on another computer. If your computer is online, you’ll see its location, wherever it is.
Apple’s security protocols are terrific, but to stay a step ahead of sophisticated cybercrime, you’ll want to turn towards additional security and privacy software, such as:
Installing a strong antivirus for Mac is an excellent step in defending your digital life. Avast One is free and protects against malware, malicious websites, and vulnerable Wi-Fi connections. Upgrade to Mac Security Pro and gain additional protection against ransomware and Wi-Fi intruders. Plus, you’ll get a host of privacy safeguards like a built-in VPN to encrypt your communications.
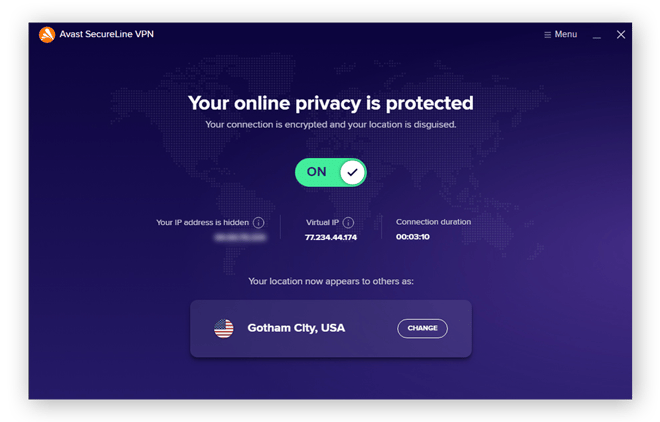
Encrypt your internet connection and stay private online with a VPN. It’s your rental car with tinted windows — nobody recognizes you as you cruise the cyberhighways. Download a 60-day free trial of Avast SecureLine VPN to enjoy worry-free browsing.
If possible, every password you create should:
Be more than 15 characters in length
Consist of multiple words that will be hard to hack, and
Be unique for that account (never use the same password twice!)
If you’re sticking with these best practices for password ideas, you’ll end up with an unwieldy amount of passwords, like the manager of an apartment building with way too many keys on their keyring. It can get confusing. Password managers do all the remembering so you don’t have to, and they will even generate high-security complicated passwords for you.
Lastly, always enable multi-factor authentication on all accounts. With the number of data breaches ever increasing, multi-factor authentication takes your security to the next level. How does it work? Multi-factor authentication goes beyond just a password and requires you to verify one additional piece of information — like a PIN code that gets sent to your phone, or your fingerprint — to get into your account.
Always follow these basic security tips to stay safe online:
Install only apps you trust from the Apple App Store and other official websites.
Avoid unsafe websites — Mac Antivirus software can easily help you with this. Even free antivirus products products will provide this protection for you.
Beware of files and links in emails. First, make sure you know the sender (check the actual email address the mail is being sent from). If anything looks suspicious, do not click any links in the email or download any attached files. Cybercriminals use social engineering and phishing techniques to get sensitive information from you. Just close the email and move on.
If you’ve purchased a Mac, you obviously care about top performance and high security. As cybercriminals develop more and more malware for Macs, give yourself an extra layer of protection with Avast One. Steer clear of malware, malicious websites, and vulnerable Wi-Fi networks, and get a suite of additional privacy safeguards.